This post contains affiliate links
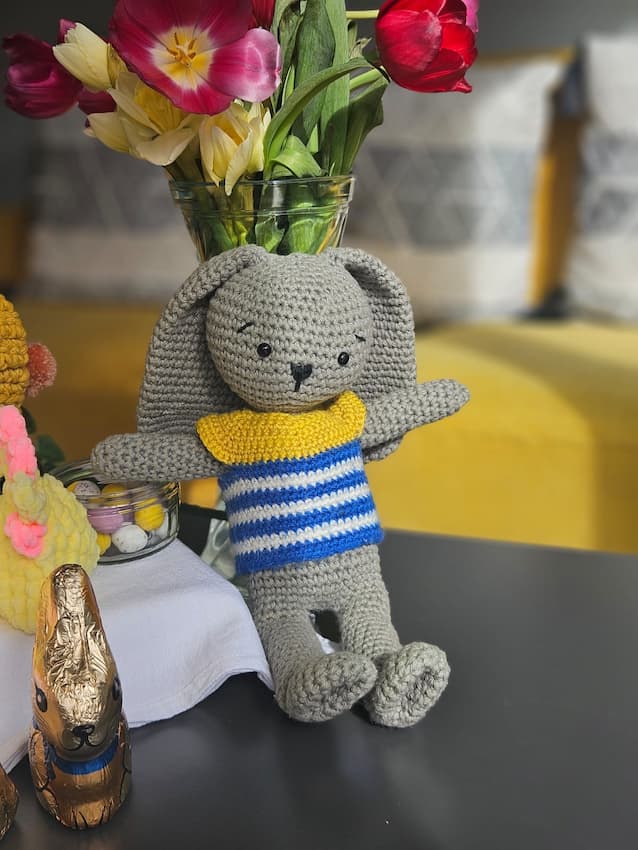
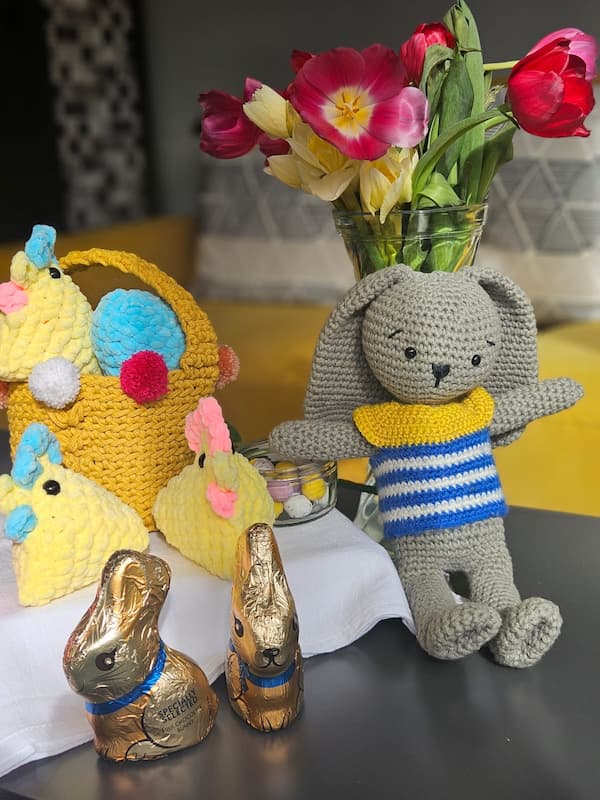
This is the easiest amigurumi toy you will make- no sew crochet bunny Theo. You work in one continuous piece with no need to sew parts together.
I realise you might be surprised to see a crochet toy on my blog as I mostly concentrate on garments and accessories.
But I do like to crochet toys from time to time to mark special occasions.
I made Theo Bunny more than 20 months ago now.
Theo is a special little cuddly toy I made for my second born son.
He likes to grab and carry him by his big long ear with his little feet dragging on the floor.
Then he tightly hugs him and says “ahhh” and it just melts my heart! I love the fact he loves his special little buddy.

DESIGN PROCESS FOR NO SEW CROCHET BUNNY
One of the main reasons I stay away from crochet amigurumi toys is because I just simply hate sewing all the separate parts together.
No matter how hard I try to sew it together at the perfect positions to make it all even and matching? It somehow always ends up with crooked arms or legs!
That’s exactly why I decided to design a toy that does what it says on the tin- no sewing required!
This is a completely no sew crochet bunny toy that is worked in one continuous piece. You start at the feet and finish at the ears all in one piece.
And what’s even better?
If you are cheeky like me and tuck your ends inside the toy rather than sew them in… you are winning, right?
As you can see being a garment designer has carried over to my toy making too!
I couldn’t resist and made Theo a little crochet sweater to keep him warm.
I made mine in “boys” colours but you can use any scrap yarn to make his sweater more girly or gender neutral.
Undoubtedly, this would make a lovely crochet toy to gift to a new member of the family.
PIN IT FOR LATER

YARN I USED FOR NO SEW CROCHET AMIGURUMI BUNNY
Although I am not a cotton lover, when it comes to amigurumi I am afraid there is no better choice.
Cotton yarn is sturdy enough without any stretch to give your crochet toys the best chance of survival.
It is possible to machine wash your handmade toys to clean them better too.
Hence why I have decided to use Lily Sugar ‘n Cream Solids cotton yarn. This 100% cotton worsted weight yarn was perfect for this project.
It gives the no sew crochet bunny real sturdiness to withstand all the pulling and poking.
You will also need a little bit of black yarn to embroider the face.
I had the cutest ball of yarn on earth Ricorumi DK from Rico Design. This yarn comes in 25g balls and a wide range of colours perfect for toy making!
Grab the ad free, PDF version of this pattern from one of my shops below!


MATERIALS
- Lily Sugar’n’Cream Solids (100% cotton; worsted/aran weight, 109m per 50g) 2 balls in Overcast (01042)
- Rico Ricorumi DK 1 ball in black (or any scrap cotton yarn to embroider nose and eyebrows)
- Scrap yarn to make jumper in colours of your choice, DK/8-ply weight, @ 20 g in each colour
- 4.5 mm and 4 mm crochet hook
- Toy stuffing
- Scissors
- Yarn needle
- Two 6 mm safety eyes
- Small plastic bottle, plastic tube or cork to strengthen the neck (optional)
NO SEW CROCHET BUNNY FINISHED SIZE
32 cm/ 12.6 inches tall
TENSION
Toy: 8 sc x 8 rows measures 5 cm using 4.5 mm crochet hook
Jumper: 11 sc x 13 rows measures 5 cm using 4 mm crochet hook

STITCHES AND ABBREVIATIONS (US CROCHET TERMS)
sc-single crochet
inc– increase- work 2 sc into indicated stitch or space
inv dec– invisible decrease- sc2tog- single crochet the following 2 sts together using invisible decrease, insert hook through front loop only of the following 2 sts, yarn over and pull through, yarn over and pull through 2 loops on hook
ch– chain stitch
sl st– slip stitch
For abbreviations master list as set out by Craft Yarn Council, please CLICK HERE.
PATTERN NOTES
- The bunny is worked feet upwards all in one piece with no sewing required
- We will create openings for arms and ears which will be worked onto the body afterwards without having to sew them on
- Each round is worked in spiral, do not slip stitch to first stitch to close the round,
- Keep a stitch marker in first stitch at all times
- Stuff firmly as you go unless told otherwise
NO SEW CROCHET BUNNY MAIN PATTERN
LEG (make 2)
Rnd 1: 6 sc into magic circle. [6 sc]
Rnd 2: inc in each st around. [12 sc]
Rnd 3: (1 sc, inc in next) 6 times. [18 sc]
Rnd 4- 6: sc around. [18 sc]
Rnd 7: (1 sc, 1 inv dec) 6 times. [12 sc]
Rnd 8: sc around. [12 sc]
Rnd 9: 6 inv dec. [6 sc]
Rnd 10: inc in each st around. [12 sc]
Rnd 11- 28: sc around. [12 sc]
Fasten off one leg. Insert toy stuffing into the leg, not the foot part. For the second leg do not fasten off, continue with Joining Legs and Body.

JOINING LEGS AND BODY
Rnd 1: with yarn attached to second leg, 4 ch, work 1 sc in each st around the first leg, 1 sc into each ch across the joining chain between 2 legs, 1 sc in each st around the second leg, 1 sc into each ch across the joining chain between legs working into the underside of the chain. Place stitch marker into first st. [32 sc]
Rnd 2 – 17: sc around. [32 sc]


Lay the bunny flat onto a surface (regardless of where your first st is) and mark out a stitch at one edge, miss 15 sc from marked st and place marker in next st. See photo for reference.

Rnd 18: (1 sc in each st to 2 sts before the marked st, 5 ch, miss 5 st) twice, sc to end. (you have created 2 holes for arms. [22 sc, two 5 ch-sp]
Rnd 19: 1 sc in each st around working 1 sc in each ch st from previous round. [32 sc]

Insert some stuffing into the body as you go.
Rnd 20: (2 sc, 1 inv dec) 8 times. [24 sc]
Rnd 21: (2 sc, 1 inv dec) 6 times. [18 sc]
Rnd 22: (1 sc, 1 inv dec) 6 times. [12 sc]
Do not fasten off. Continue pattern with Head.

HEAD
Rnd 23: sc around. [12 sc]
Rnd 24: (1 sc, inc in next) around. [18 sc]
Rnd 25: (2 sc, inc in next) around. [24 sc]
Rnd 26: (3 sc, inc in next) around. [30 sc]
Rnd 27: (4 sc, inc in next) around. [36 sc]
Rnd 28: (5 sc, inc in next) around. [42 sc]
Rnd 29: (6 sc, inc in next) around. [48 sc]
Rnd 30 – 37: sc around. [48 sc]
Rnd 38: (6 sc, 1 inv dec) around. [42 sc]
Rnd 39: (5 sc, 1 inv dec) around. [36 sc]
Rnd 40: (4 sc, 1 inv dec) around. [30 sc]

Rnd 41: (3 sc, 1 inv dec) 3 times, 3 ch, miss 3 sts, 1 inv dec, 3 sc, 2 inv dec, 3 ch, miss last 3 sts. (you have created 2 holes for ears, they sit slightly to the back of the head) [24 sc]

Insert safety eyes between rows 32 and 33. I have inserted a small plastic bottle into the neck to stop the head flopping. You can use plastic tube, foam curler, cork from a champagne bottle or anything else you can find around the house that is the right size.


Rnd 42: (2 sc, 1 inv dec) 6 times working over the ch sts from prev round. [18 sc]
Rnd 43: (1 sc, 1 inv dec) 6 times. [12 sc]
Rnd 44: inv dec 6 times. [6 sc]
Fasten off stuff and sew up the top of the head. With black yarn embroider a small triangle for the nose and eyebrows.
ARMS
Rnd 1: working into the 5 missed stitches of the body and into the underside of the 5 chain stitches 1 sc into each st around. [10 sc]
Rnd 2- 13: sc around. [10 sc]
Rnd 14: (3 sc, 1 inv dec) twice. [8 sc]
Rnd 15: (2 sc, 1 inv dec) twice. [6 sc]
Insert toy stuffing, fasten off and sew up the opening.
Repeat for the other arm.
EARS
Rnd 1: working into the 3 missed stitches of the head and into the underside of the 3 chain stitches 1 sc into each st around. [6 sc]
Rnd 2: inc in each st around. [12 sc]
Rnd 3: sc around. [12 sc]
Rnd 4: (1 sc, inc in next) 6 times. [18 sc]
Rnd 5: sc around. [18 sc]
Rnd 6: (2 sc, inc in next) 6 times. [24 sc]
Rnd 7 – 26: sc around. 20 rounds in total. [24 sc]
Rnd 27: (2 sc, 1 inv dec) around. [18 sc]
Rnd 28: (1 sc, 1 inv dec) around. [12 sc]
Rnd 29: inv dec 6 times. [6 sc]
Fasten off and sew up the opening.
Repeat for the other ear.

JUMPER FOR NO SEW CROCHET BUNNY
For the jumper I used scraps of DK/8-ply weight yarn in 3 different colours, you can change up the colours if the toy is intended for a girl.
Yarn A- mustard, Yarn B- navy blue, Yarn C- white.
With yarn A and 4 mm crochet hook chain 31.
Row 1: starting in second ch from hook 1 sc across. Turn. [30 sc]
Row 2: 1 ch (doesn’t count as a st throughout), (4 sc, inc in next) 6 times. Turn. [36 sc]
Row 3: 1 ch, (5 sc, inc in next) 6 times. Turn. [42 sc]
Row 4: 1 ch, (6 sc, inc in next) 6 times. Turn. [48 sc]
Row 5: 1 ch, (7 sc, inc in next) 6 times. Turn. [54 sc]
Row 6: 1 ch, (8 sc, inc in next) 6 times. Turn. [60 sc]
Row 7: 1 ch, (9 sc, inc in next) 6 times. Turn. [66 sc]
Row 8: 1 ch, (10 sc, inc in next) 6 times. Turn. [72 sc]
Row 9: 1 ch, (11 sc, inc in next) 6 times. Turn. [78 sc]
Row 10: 1 ch, 10 sc, 5 ch, miss 19 sts, 20 sc, 5 ch, miss 19 st, 10 sc to end, sl st to first sc to join into a round, continue working in rounds. [50 sc]
Rnd 11 – 12: with Yarn B 1 ch, sc around, sl st to 1st sc. [50 sc]
Rnd 13 – 14: with Yarn C 1 ch, sc around, sl st to 1st sc. [50 sc]
Repeat Rnd 11 – 14 two more times. Repeat Rnd 11 – 12 once more.
Fasten off, dress the bunny in the jumper and with Yarn A sew up the opening at the back of the jumper.
FINISHING INSTRUCTIONS
Sew in all ends. Dress Theo in his cute sweater and he is ready to go!

Final Thoughts
I hope you enjoyed this free pattern and if you think some of your crochet friends would enjoy it too, why not she the link with them?
You might also enjoy these patterns:
- Free Crochet Easter Basket Pattern
- 5 Cute Free Crochet Worry Worms Pattern Ideas.
- Peafowl Feathers Shawl crochet pattern
- Shoreline Sweater pattern
- 10 Free Baby Crochet Pattern Ideas
- 10 Adorable FREE Crochet Owl Patterns
SHARE – If you think your crafty friends will like this, why not share the link with them? Alternatively, you can also share a direct link to this page on your social media so more people can crochet with us. Follow me on Facebook or Instagram and use #bluestarcrochet
PIN – do not forget to pin this page to your favorite Pinterest Board so you can easily find it later too.
JOIN – join like-minded crocheters working on my projects inside the Blue Star Crochet Facebook Community Group
SUBSCRIBE – It’s such an honour to share my crochet patterns with you and to be part of your creative journey. I’d love to stay connected and keep you inspired with new patterns, special discounts, and little surprises along the way. Sign up for my email newsletter & join a community of makers and enjoy a free gift as a thank-you for being here!

Veronika Cromwell | Blue Star Crochet
Veronika is a master in modern crochet design.
With a relentless focus on innovation and a vision that knows no bounds, she meticulously hones her crochet expertise she shares via crochet patterns, tutorials and online courses.
She helps the knowledge-thirsty crocheters bulldoze their way through hundreds of crochet techniques effortlessly and with ease like sharp scissors cutting thread.
Creating timeless fashion pieces without the “use-by-date” that stand the test of time in modern world is her lifelong mission.
Featured in Inside Crochet, Simply Crochet, Crochet Now and Happily Hooked and other awesome spaces on the internet, you too can join the crochet revolution!
Join her as she conquers the crochet world, one stitch at a time.


What an adorable bunny. I love patterns that limit the sewing.
Thank you!