This post contains affiliate links
OPEN FRONT CROCHET GAP YEAR CARDIGAN
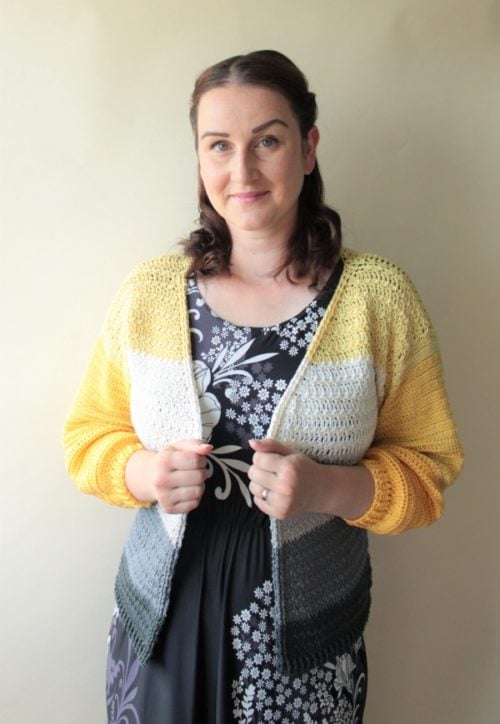
I love this open front crochet cardigan for its relaxed drapy feel and open front- my Gap Year Cardigan. Enjoy another free crochet pattern on the blog, read why I’m cotton yarn convert or scroll down for the free pattern.

OPEN FRONT CROCHET CARDIGAN DESIGN PROCESS
Firstly, I have a confession to make.
If you have been following for a while you might know that I am not a cotton yarn fan. BUT… I just love the feel of this easy crochet cardigan!
The cotton yarn gives this open front crochet cardigan that lovely smooth drape the way that not any other yarn can do.
I have designed this cardigan with cropped length.
The front neckline hem is worked as part of each row so you don’t have to work it afterwards.
I added 3/4 sleeves so it is perfect for those warmer months or transition periods between warmer and colder seasons.
The open front ads to the relaxed feel so you can just “throw a cardi on” whatever you are wearing.
The pattern can be easily adjusted, if you prefer more classic look to your cardigans.
I have included size adjustment instructions to change the length and width.

This blog post contains affiliate links and if you click through them to make a purchase, I will earn a commission. I link these companies and their products because of their quality and service not because of the commission I receive from your purchase.
YARN I CHOSE FOR MY OPEN FRONT CROCHET CARDIGAN
I have used Cascade Yarns Ultra Pima Cotton for this beginner friendly open front crochet cardigan pattern.
It gives the pattern a beautiful stitch definition while staying soft and oh, that drape!
Moreso, have you seen the choice of colours? To tell the truth, this yarn has been a leftover from another project.
I am so glad I had enough for an open front cardigan.
I love the nod to the ombre colour sequence in grey and yellow.
However, you can choose so many other colour combinations or keep the cardigan one coloured.
Using all different colours might be perfect for a stashbusting crochet cardigan too!


Get the ad-free PDF from my shops below

Get the ad free, printer friendly PDF version of this pattern from ETSY or RAVELRY.
MATERIALS
- Cascade Yarns Ultra Pima [100% cotton; DK weight; 200m per 100g ball]
- 1 (1, 1, 2, 2, 2, 2, 2, 2) balls in each colour Dark Shadow (3831), Gray (3729), Silver (3801), Natural (3718), Yellow Rose (3743), Sunshine (3764), Buttercup (3748)
- for alternative yarns you will need approximately 940 (1060, 1200, 1370, 1520, 1640, 1800, 1930, 2090) metres of yarn
I have tried my best to accurately calculate the amount of yarn needed for each size. But please note the exact quantities will vary depending on your tension and any size adjustments you might make. Therefore, if you are unsure, I’d recommend buying more yarn rather than not enough.
- 4.5 mm crochet hook
- Yarn needle
- Scissors
- Tape measure
OPEN FRONT CROCHET CARDIGAN FINISHED SIZE
| SIZE | CHEST CIRUMFERENCE | TOTAL LENGTH | SLEEVE LENGTH FROM UNDERARM |
| XS | 86cm | 53cm | 41cm |
| S | 95cm | 54cm | 42cm |
| M | 106cm | 55cm | 42cm |
| L | 116cm | 57cm | 43cm |
| XL | 127cm | 58cm | 43cm |
| 2XL | 137cm | 58cm | 44cm |
| 3XL | 147cm | 59cm | 44cm |
| 4XL | 156cm | 60cm | 46cm |
| 5XL | 166cm | 61cm | 46cm |
Model is UK size 10-12, wearing size M. The cardigan has been designed with open front, cropped in length with ¾ length sleeves and 9-10cm positive ease.
TENSION
17 sts x 10 rows = 10 x 10 cm measured over dc
STITCHES AND ABBREVIATIONS (US CROCHET TERMS)
ch- chain stitch
FPdc- front post double crochet
BPdc- back post double crochet
dc- double crochet
sc- single crochet
dc blo- double crochet through back loop only
hdc- half double crochet
sc2tog- single crochet the following 2 stitches together
dc2tog- double crochet the following 2 stitches together

OPEN FRONT CROCHET CARDIGAN PATTERN NOTES
- The pattern starts with working the bottom hem of the cardigan in full circumference/width
- The back and two front halves are worked together in one piece up to arm openings
- The front hem around the neckline is worked as part of each row at the beginning and end
- The panel is then divided between back panel and two front halves
- The front halves are shaped into V neckline by decreasing on each side
- It’s a seamless design apart from 2 seams at shoulders
- The sleeves are worked directly onto the main body of the cardigan, the first round is worked around the end stitches of the armhole rows in round
- They are slightly tapered by decreasing every 5th round but they retain their oversized balloon shape
- The sleeves are finished off by adding a mock ribbing sleeve cuff
- Colour changes- I have worked with a leftover yarn from another project so my sections are not even but who doesn’t love a stash buster project, right?
If you are using full hanks of yarn change colour every 11 (11, 11, 12, 12, 12, 12, 12, 12) rows for the main body. Then add/take away 0 (1, 2, -1, 0, 0, 1, 2, 3) rows in Yellow Rose
For the sleeves I used 2 colours, to evenly split the sleeve colours work 16 (16, 16, 16, 16, 17, 17, 18, 18) rounds in Sunshine and the remaining rounds in Buttercup
SIZE ADJUSTMENTS
- The starting chain determines the overall chest circumference. To make a larger chest circumference add stitches to the starting chain. Take away stitches if you want to reduce the chest circumference. Please note for the pattern to work you will need an odd number of stitches in total
- The number of rows determines the finished length of the cardigan, to adjust it add/take away rows from the main body before splitting the panel for back and front panels
- The sleeves are slightly tapered giving them more of an oversized/balloon look. If you prefer more tapered sleeves, work the decrease round more often (every 4th or 3rd round). To make the sleeves more oversized, work the decrease round less often or omit the decrease round completely.

OPEN FRONT CROCHET CARDIGAN MAIN PATTERN
For instructions on colour changes please see pattern notes.
MAIN BODY PANEL HEM
With Dark Shadow (yarn A) chain 147 (163, 179, 201, 217, 235, 251, 267, 283)
Row 1: starting in 4th ch from hook, 1 dc across to end, turn. 145 (161, 177, 199, 215, 233, 249, 265, 281) dc
Row 2: 3 ch (counts as first dc here and throughout the pattern), (1 FPdc, 1 BPdc) repeat to last 2 sts, 1 FPdc, 1 dc into top of beg 3ch, turn.
Row 3: 3 ch, (1 BPdc, 1 FPdc) repeat to last 2 sts, 1 BPdc, 1 dc into top of beg 3ch, turn.
Do not fasten off, continue pattern with Main Body.
MAIN BODY
Row 1 (RS): 3 ch, (1 FPdc, 1 BPdc) twice, 1 dc across to last 5 sts, (1 BPdc, 1 FPdc) twice, 1 dc into top of beg 3 ch, turn.
Row 2 (WS): 3 ch, (1 BPdc, 1 FPdc) twice, **(1 sc, 1 dc) in next, miss one st; repeat from ** across to last 6 sts, 1 sc in next, (1 FPdc, 1 BPdc) twice, 1 dc into top of beg 3 ch, turn.
Repeat row 1-2 pattern until you have 34 (34, 34, 34, 34, 32, 32, 32, 32) rows in total. Do not fasten off.

SPLIT FOR ARMHOLES
RIGHT FRONT HALF
Row 35 (35, 35, 35, 35, 33, 33, 33, 33): 3 ch, (1 FPdc, 1 BPdc) twice, 31 (35, 39, 45, 49, 53, 57, 61, 65) dc, turn leaving the remaining sts unworked. 36 (40, 44, 50, 54, 58, 62, 66, 70) sts
Row 36 (36, 36, 36, 36, 34, 34, 34, 34): 1 ch (doesn’t count as a st here and throughout), **(1sc, 1 dc) in same st, miss one st; repeat from ** across to last 6 sts, 1 sc in next, (1 FPdc, 1 BPdc) twice, 1 dc into top of beg 3 ch, turn. 36 (40, 44, 50, 54, 58, 62, 66, 70) sts
Repeat last 2 rows 0 (0, 0, 1, 1, 2, 2, 2, 2) times. 36 (40, 44, 50, 54, 58, 62, 66, 70) sts
V NECK SHAPING
Row 37 (37, 37, 39, 39, 39, 39, 39, 39): 3 ch, (1 FPdc, 1 BPdc) twice, 1 dc2tog, 1 dc to end, turn. 35 (39, 43, 49, 53, 57, 61, 65, 69) sts
Row 38 (38, 38, 40, 40, 40, 40, 40, 40): 1 ch, **(1sc, 1 dc) in same st, miss one st; repeat from ** across to last 7 sts, 1 sc2tog, (1 FPdc, 1 BPdc) twice, 1 dc into top of beg 3 ch, turn. 34 (38, 42, 48, 52, 56, 60, 64, 68) sts
Repeat last two rows of V neck shaping until you have 18 (19, 20, 22, 23, 25, 26, 27, 28) rows of RIGHT FRONT HALF in total counting from the split for armholes row. Fasten off. 20 (23, 26, 32, 35, 39, 42, 45, 48) sts
BACK PANEL
Rejoin yarn in next stitch to the Right Front half to work the back panel.
Row 35 (35, 35, 35, 35, 33, 33, 33, 33): 3 ch (counts as first dc), 72 (80, 88, 98, 106, 116, 124, 132, 140) dc, turn leaving the remaining sts unworked. 73 (81, 89, 99, 107, 117, 125, 133, 141) sts
Row 36 (36, 36, 36, 36, 34, 34, 34, 34): 1 ch, **(1sc, 1 dc) in same st, miss one st; repeat from ** across to last sts, 1 sc in last st, turn. 73 (81, 89, 99, 107, 117, 125, 133, 141) sts
Repeat last 2 rows until you have 18 (19, 20, 22, 23, 25, 26, 27, 28) rows of BACK in total counting from the split for armholes. Fasten off.
LEFT FRONT HALF
Rejoin yarn in next stitch to the Back panel to work the left front panel.
Row 35 (35, 35, 35, 35, 33, 33, 33, 33): 3 ch (counts as first dc), 30 (34, 38, 44, 48, 52, 56, 60, 64) dc, (1 BPdc, 1 FPdc) twice, 1 dc into top of beg 3 ch, turn. 36 (40, 44, 50, 54, 58, 62, 66, 70) sts
Row 36 (36, 36, 36, 36, 34, 34, 34, 34): 3 ch, (1 BPdc, 1 FPdc) twice **(1sc, 1 dc) in same st, miss one st; repeat from ** across to last st, 1 sc in last st, turn. 36 (40, 44, 50, 54, 58, 62, 66, 70) sts
Repeat last 2 rows 0 (0, 0, 1, 1, 2, 2, 2, 2) times. 36 (40, 44, 50, 54, 58, 62, 66, 70) sts
V NECK SHAPING
Row 37 (37, 37, 39, 39, 39, 39, 39, 39): 3 ch, 1 dc across to last 7 sts, 1 dc2tog, (1 BPdc, 1 FPdc) twice, 1 dc into top of beg 3 ch, turn. 35 (39, 43, 49, 53, 57, 61, 65, 69) sts
Row 38 (38, 38, 40, 40, 40, 40, 40, 40): 3 ch, (1 FPdc, 1 BPdc) twice, 1 sc2tog, miss one st **(1sc, 1 dc) in same st, miss one st; repeat from ** across to last st, (1hdc, 1 sc) in last st, turn. 34 (38, 42, 48, 52, 56, 60, 64, 68) sts
Repeat last two rows of V neck shaping until you have 18 (19, 20, 22, 23, 25, 26, 27, 28) rows of LEFT FRONT HALF in total counting from the split for armholes. Fasten off. 20 (23, 26, 32, 35, 39, 42, 45, 48) sts
Fold and line up the left and right front halves to the back panel so that WS are together and the shoulders are aligned. Sew or crochet through both layers together at shoulder seams. Turn the right side out.
SLEEVES
Join yarn to underarm. You will be working around the posts of the st along the armhole edge for round 1. Pick up sts by working 3 dc around each end dc st and 1 dc around each end sc st.
Rnd 1: 3 ch (counts as first dc), pick up dc sts around armhole opening, sl st to top of beg 3 ch. 72 (78, 80, 88, 94, 102, 104, 110, 112) dc.
Rnd 2: 3 ch, 1 dc blo around, sl st to top of beg 3 ch.
Repeat rnd 2 another 3 times.
Rnd 6 (decrease round): 2 ch, 1 dc in next (counts as 1 dc2tog), 1 dc around to last 2 sts, 1 dc2tog, sl st to first dc. 70 (76, 78, 86, 92, 100, 102, 108, 110) dc.
Repeat rnd 2- 6 another 4 times for all sizes. 62 (68, 70, 78, 84, 92, 94, 100, 102) dc
SIZES XS, S, M ONLY
Continue pattern with Sleeve Cuff. 62 (68, 70)
SIZES L, XL ONLY
Rnd 27: repeat Rnd 6. 76 (82) sts
SIZES 2XL, 3XL
Rnd 27: repeat Rnd 2.
Rnd 28: repeat Rnd 6. 90 (92) sts
SIZES 4XL, 5XL ONLY
Rnd 27-29: repeat Rnd 2.
Rnd 30: repeat Rnd 6. 98 (100) sts
SLEEVE CUFF ALL SIZES
Next rnd: 1 ch (doesn’t count as a st), 1 sc2tog around, sl st to first st. 31 (34, 35, 38, 41, 45, 46, 49, 50) st
Next rnd: 3 ch, 1 dc around, sl st to top of beg 3 ch.
Next rnd: 2 ch (doesn’t count as a st), starting around 3 ch from prev rnd, (1 FPdc, 1 BPdc) around, sl st to first st.
Repeat last rnd another two times. Fasten off.
FINISHING INSTRUCTIONS
Sew in all ends and block to dimensions.
The cardigan can be worn both ways- as an open front cardigan or you can pull the front halves together and fix them in position with a pin or brooch.

Happy crocheting!
For all my previously published patterns visit my shops, find all the links HERE.
Check out my other free patterns here on the blog!


Veronika Cromwell | Blue Star Crochet
Veronika is a master in modern crochet design.
With a relentless focus on innovation and a vision that knows no bounds, she meticulously hones her crochet expertise she shares via crochet patterns, tutorials and online courses.
She helps the knowledge-thirsty crocheters bulldoze their way through hundreds of crochet techniques effortlessly and with ease like sharp scissors cutting thread.
Creating timeless fashion pieces without the “use-by-date” that stand the test of time in modern world is her lifelong mission.
Featured in Inside Crochet, Simply Crochet, Crochet Now and Happily Hooked and other awesome spaces on the internet, you too can join the crochet revolution!
Join her as she conquers the crochet world, one stitch at a time.


Thank you for sharing this pattern Can’t wait to try
thank you. I hope you will enjoy it ?