This post contains affiliate links
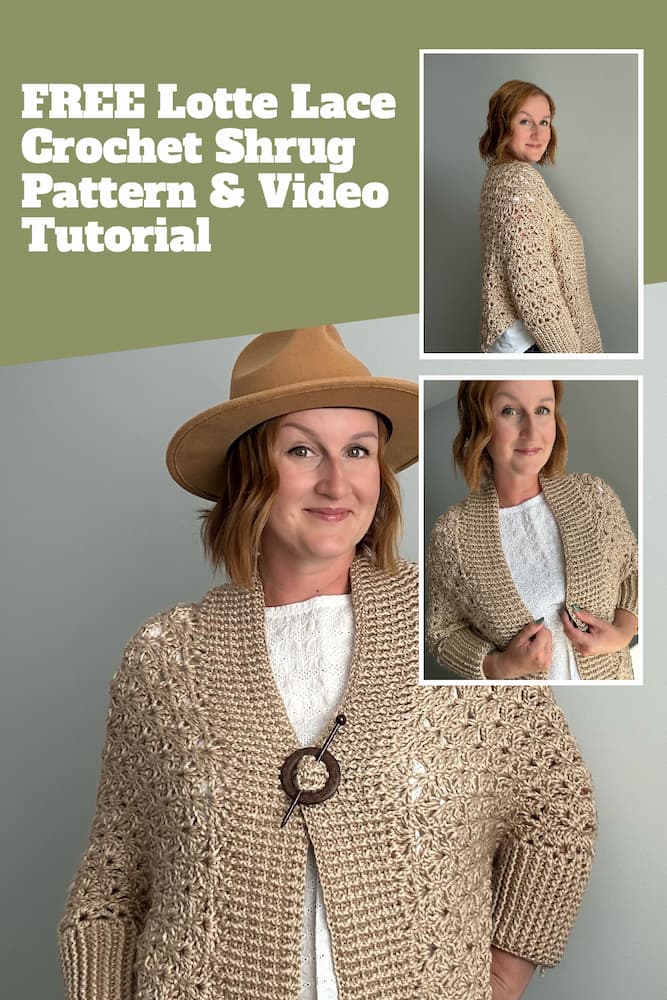
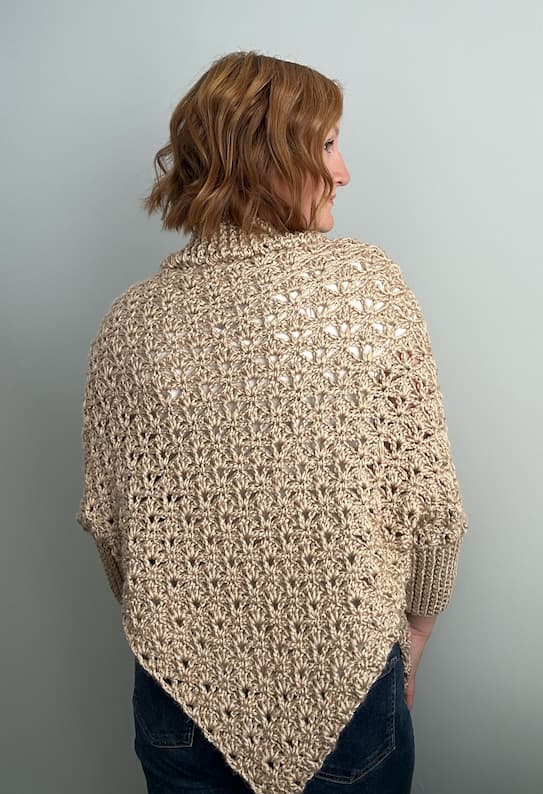
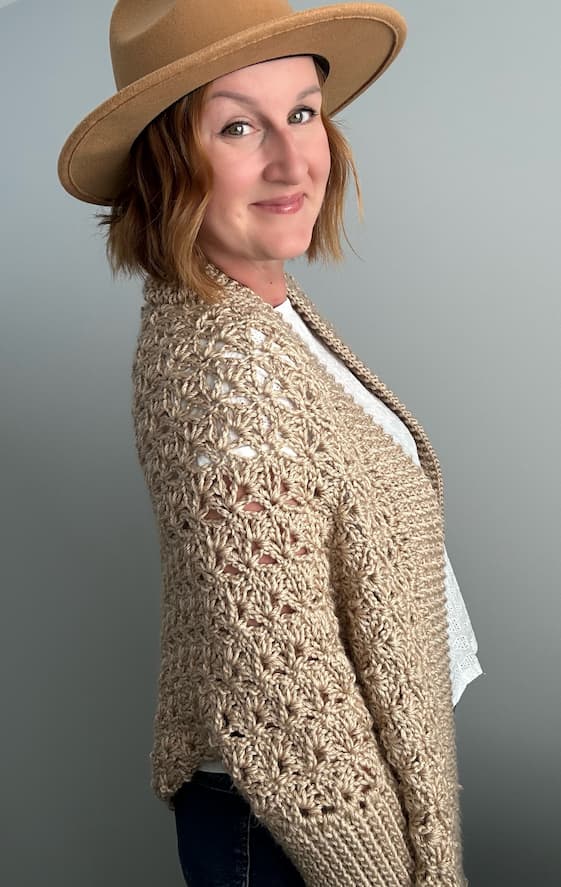
Make this super stylish lace crochet shrug that is perfect for the end of summer cooler evenings and for the start of fall season! Constructed from one triangle piece with a statement collar and sleeves it will soon become your wardrobe favorite!
As the end of the summer approaches and the leaves turn golden and the air takes on that crisp, cozy feel, there’s nothing better than wrapping yourself in a handmade piece that’s as warm as it is beautiful.
The Lotte Lace Crochet Shrug is the perfect project for the end of summer and early fall — a stunning blend of comfort, elegance, and versatility.
Designed with worsted weight yarn, this shrug offers just the right amount of warmth for layering during transitional weather, while the Lotte Lace stitch pattern adds a delicate, open texture that keeps the fabric light and breathable.
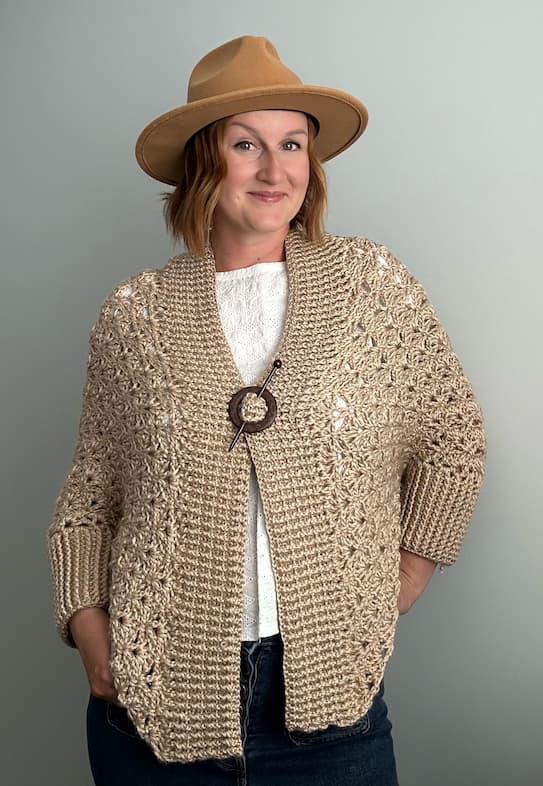
What truly sets this shrug apart is its shawl collar, which drapes effortlessly around the neckline, creating a flattering silhouette that complements everything from casual jeans and tees to flowy dresses and boots.
Whether you’re an experienced crocheter looking for a relaxing project or a confident beginner ready to learn a new stitch pattern, this design is just what you need!
In this tutorial, I will walk through everything you need to know — from choosing the right yarn and hook size to mastering the Lotte Lace stitch and seaming your shrug for the perfect fit.
By the time you finish, you’ll have a timeless, handmade piece you’ll be proud to wear all season long.
So, grab your favorite skeins in rich autumn hues — think warm rust, deep plum, or classic cream — and let’s dive into this cozy, creative journey together.
The Lotte Lace Crochet Shrug isn’t just a project; it’s a staple piece for your handmade wardrobe that you’ll reach for year after year.
PIN THIS PATTERN FOR LATER
Lace Crochet Shrug – Lotte Lace Pattern Details
Would you have ever thought that you can make such a stylish piece of wearable crochet just from a simple triangle?
Well, now you can! This stunning lace crochet shrug is made from a simple triangle using the ever so popular Lotte Lace crochet stitch!
We will work up our triangle in corner to corner technique using this stitch. Once we reach the desired size, we will simply turn it into a shrug.
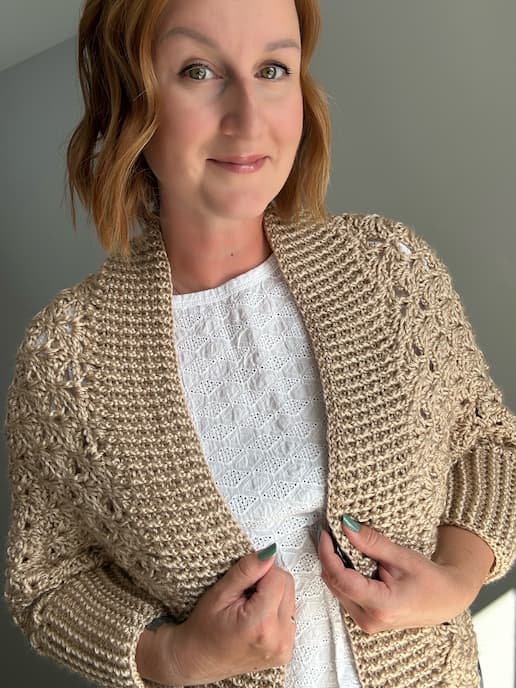
We will add a statement shawl collar using the mock ribbing. You can completely make the shrug your own by going to a subtle or super-overside collar.
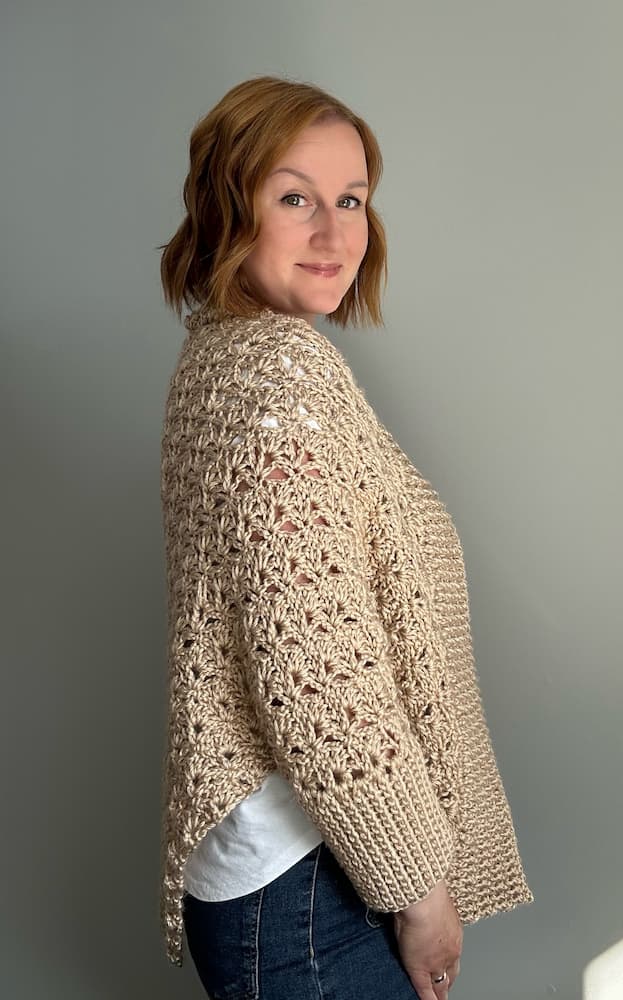
Afterwards, we will also add a mock ribbing sleeves that will turn the humble rectangle into something you can wear.
Whether it is a cool late summer evening or the start of the fall season, you can keep warm in a stylish way!
Get the ad-free PDF crochet pattern from my shops below:


Lace Crochet Shrug – Lotte Lace Main Pattern
This pattern is also available inside The crAFTER Design Lab – a crochet playground with over 200 patterns, tutorials and classes!

Materials
- Wander by Furls Fibrerarts (100% acrylic; 120yds/109m per 100g; worsted weight/ category 4 weight) x 7 (8, 8, 8, 8, 9, 9, 10, 10) balls in Sandbar
- Blocking T-pins
- Blocking Mats
- 6.5 mm crochet hook
- 5.5 mm crochet hook
- Yarn needle
- Scissors
Yarn Substitutes
- Twill – 149 yds per 100g – Like the fabric for which it’s named, Twill is a hearty yarn with structure—perfect for hats, scarves, mittens, and fitted garments. The 3-ply twist and satisfying density of this 100% Merino wool yarn results in absolutely gorgeous stitch definition, making both intricate and straightforward patterns shine.
- City Tweed Aran/HW – 164yds per 100g – City Tweed begins with alpaca and Merino fibers dyed two different colors and then blended together to make a subtly rich, lustrous heather. The choice of neutral color Donegal tweed neps are incorporated into the 2-ply yarn.
- Premier Elle by Me Charlotte-Solids Yarn – 5.29 oz/150g/196 yd/180m ball – Create cozy yet durable projects with Premier Yarns Elle by Me Charlotte Solids yarn. It holds the Oeko-Tek Standard 100 certification, meaning it has been tested and found free of harmful substances and is gentle on sensitive skin.
- Caron Simply Me Yarn – 7 oz/200g/246yd/225m ball – Caron Simply Me yarn is a soft, all-purpose bulky weight yarn in a lively color palette designed to show off your personality and make projects simply yours!
Stitches And Abbreviations (US Crochet Terms)
ch – chain stitch
sc – single crochet
ch-sp – chain space
dc – double crochet
V st – (1 dc, 1 ch, 1 dc)
shell – (1 dc, 1 ch) 4 times, 1 dc in same st/sp
tr – treble crochet
FPdc – front post double crochet – work a double crochet stitch around the post of the stitch inserting hook from front to back to front
BPdc – back post double crochet – work a double crochet stitch around the post of the stitch inserting hook from back to front to back
sl st – slip stitch
stand dc – standing double crochet – extend loop, hold with index finger, twist around hook towards you, insert hook, yarn over and pull through = 3 loops on the hook, (yarn over, pull through 2 loops) twice to finish the stitch. For a full tutorial please CLICK HERE.
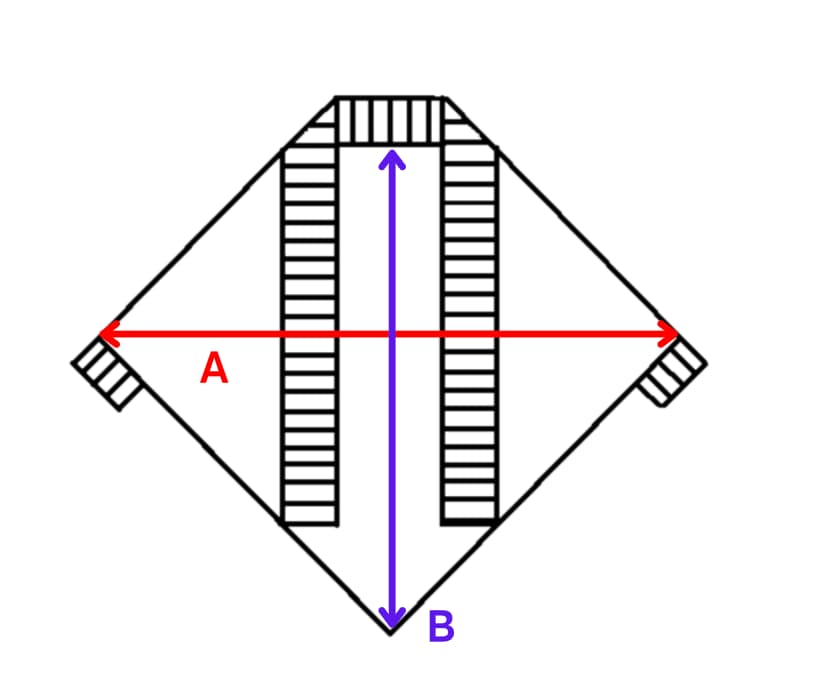
Lace Crochet V-neck Top For Summer Finished Size
| Size | FINISHED SHRUG WIDTH (A) | FINISHED SHRuG LENGTH (excluding collar) (B) |
| XS | 73 cm/ 28.75 inch | 81 cm/ 32 inch |
| S | 76 cm/ 30 inch | 84 cm/ 33 inch |
| M | 78 cm/ 30.75 inch | 86 cm/ 34 inch |
| L/XL | 81 cm/ 32 inch | 89 cm/ 35 inch |
| 2XL/3XL | 84 cm/ 33 inch | 92 cm/ 36.25 inch |
| 4XL/5XL | 87 cm/ 34.25 inch | 95cm/ 37.5 inch |
Tension/Gauge
Gauge
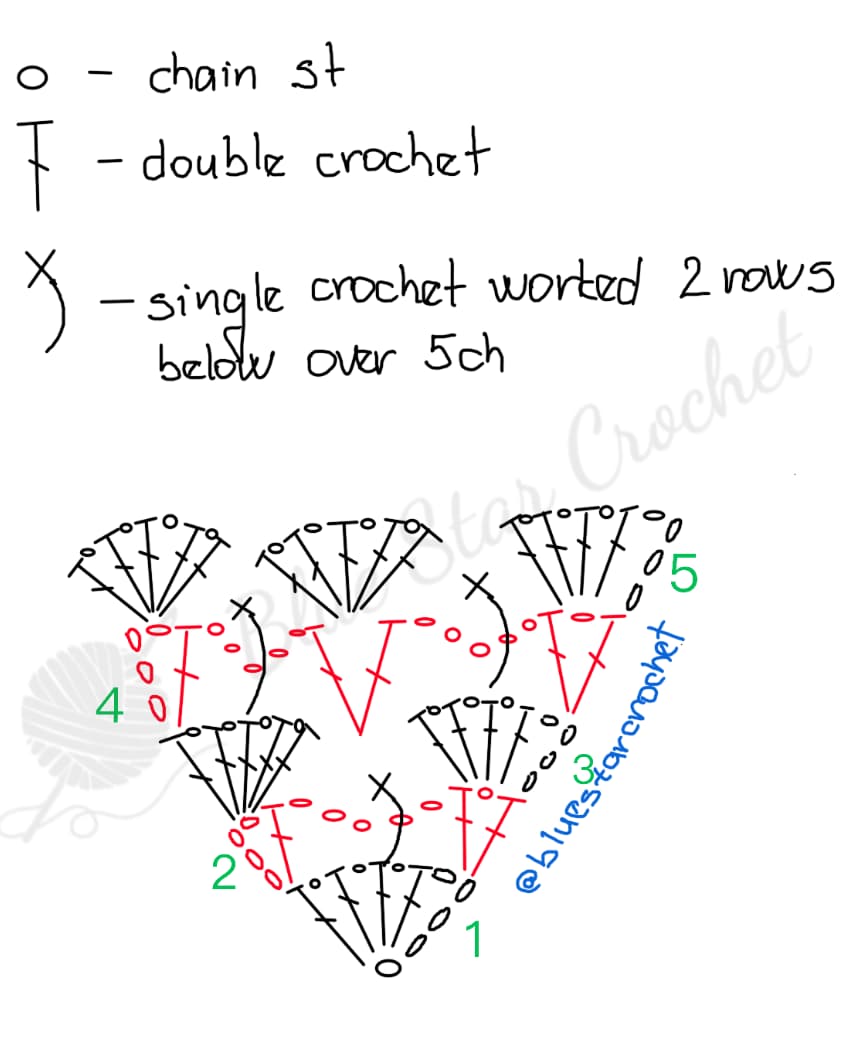
With larger hook chain 5.
Row 1: miss 4 ch (counts as 1 dc + 1 ch-sp), start working into last ch, (1 dc, 1 ch) 3 times, 1 dc in same st, turn.
Row 2: 1 stand dc in first st, 1 ch, 1 dc in same st, 5 ch, 1 V st into 3rd ch of beg 4 ch from previous row, turn.
Row 3: 1 stand dc in first st, 1 ch, working into first V st ch-sp (1 dc, 1 ch) 3 times, 1 dc in same ch-sp; 1 sc into 3rd dc on the shell 2 rows below working over 5 ch from previous row fixing it in position, 1 shell into last V st working last dc into top of last st, turn.
Row 4: 1 stand dc in first st, 1 ch, 1 dc in same st (counts as first V st), 5 ch, miss next shell, 1 V st into next sc, 5 ch, miss next shell, 1 V st into top of last dc, turn.
Row 5: 1 stand dc in first st, 1 ch, working into first V st ch-sp (1 dc, 1 ch) 3 times, 1 dc in same st; 1 sc into 3rd dc on the shell 2 rows below working over 5 ch from previous row fixing it in position, 1 shell into next V st, 1 sc into 3rd dc on the shell 2 rows below working over 5 ch from previous row fixing it in position, 1 shell into last V st working last dc into top of last st, turn.
Row 6: 1 stand dc in first st, 1 ch, 1 dc in same st (counts as first V st), (5 ch, miss next shell, 1 V st into next sc) repeat across until last shell, 5 ch, miss next shell, 1 V st into top of last dc, turn.
Row 7: 1 stand dc in first st, 1 ch, working into first V st ch-sp (1 dc, 1 ch) 3 times, 1 dc in same st; (1 sc into 3rd dc on the shell 2 rows below working over 5 ch from previous row fixing it in position, 1 shell into next V st) repeat across until last V st, 1 sc into 3rd dc on the shell 2 rows below working over 5 ch from previous row fixing it in position, 1 shell into last V st working last dc into top of last st, turn.
Repeat Row 6 – 7 until your swatch is big enough to measure out a 10 x 10 cm / 4 x 4 inch area in the middle.
Count how many stitches and rows fit into this area.
If you have less than 2 shells and 7 rows, you need to use a smaller hook.
If you have more than 2 shells and 7 rows, you need to use a larger hook.
Pattern Notes
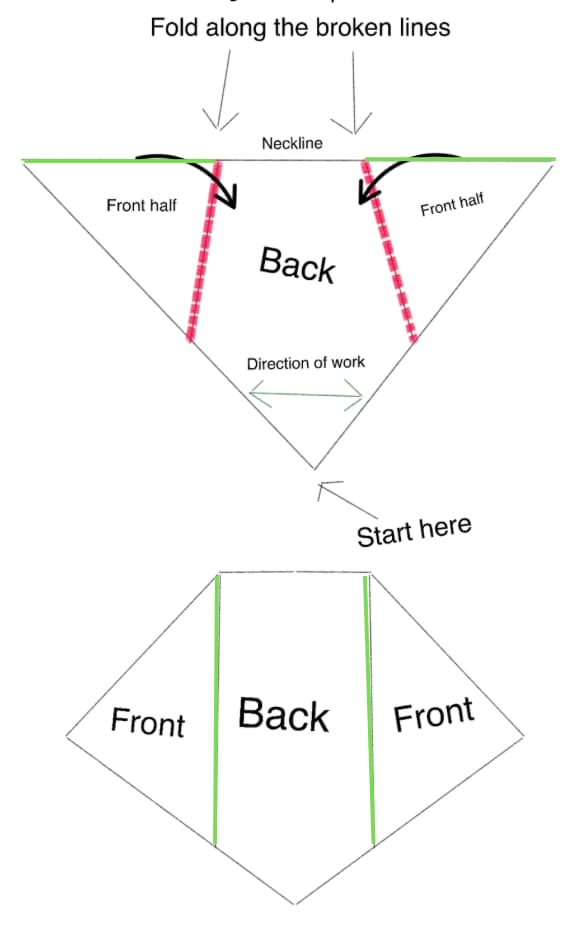
- the shrug is made up from a triangle shape
- you will start working at the bottom point of the triangle and increase on both sids in corner to corner technique
- once we reach the desired size of the triangle, we will work on the mock ribbing section which will create the neckline and front opening
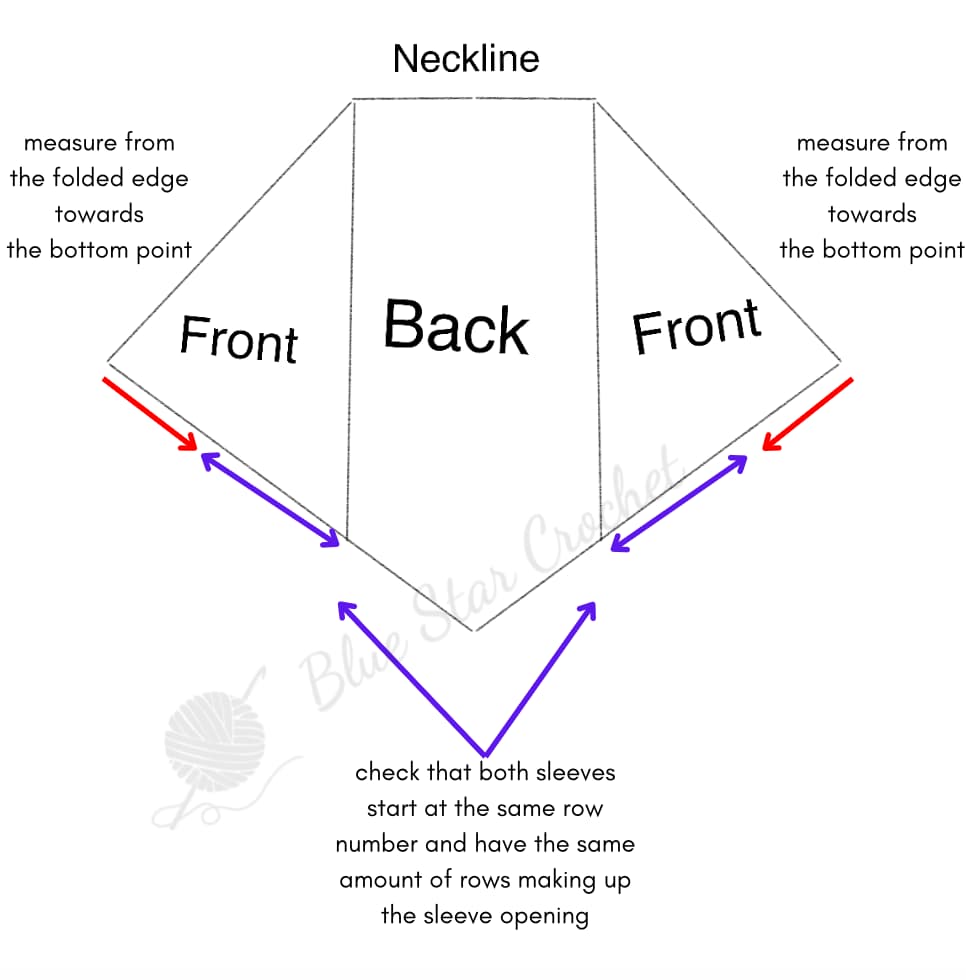
- then we will fold the triangle over on both sides to create the back and two front halves
- we will then measure out where to position our sleeves
- the sleeves are then worked straight onto the body of the shrug
- Note: The pattern is written out for 9 sizes as follows XS (S, M, L, XL, 2XL, 3XL, 4XL, 5XL)
- The stitches in italic separated by [] are stitch counts, those stitches are not to be worked again.
Lace Crochet Shrug Pattern Video Tutorial
I have filmed a step-by-step video tutorial for this amazing lace crochet shrug pattern.
You can watch it right here on the blog, just press the PLAY button below.
Note: if you enabled an ad-blocker, you will not see the video.
Alternatively, you can also watch the video tutorial on my YouTube channel. Don’t forget to subscribe and turn the notifications on.

Lace Crochet T-shirt Pattern Stitch Diagram
Lace Crochet Shrug Written Pattern – Lotte Lace Shrug
Main Body Fabric
With larger hook chain 5.
Row 1: miss 4 ch (counts as 1 dc + 1 ch-sp), start working into last ch, (1 dc, 1 ch) 3 times, 1 dc in same st, turn.
Row 2: 1 stand dc in first st, 1 ch, 1 dc in same st (counts as first V st), 5 ch, 1 V st into 3rd ch of beg 4 ch from previous row, turn.
Row 3: 1 stand dc in first st, 1 ch, working into first V st ch-sp (1 dc, 1 ch) 3 times, 1 dc in same ch-sp; 1 sc into 3rd dc on the shell 2 rows below working over 5 ch from previous row fixing it in position, 1 shell into last V st working last dc into top of last st, turn.
Row 4: 1 stand dc in first st, 1 ch, 1 dc in same st (counts as first V st), 5 ch, miss next shell, 1 V st into next sc, 5 ch, miss next shell, 1 V st into top of last dc, turn.
Row 5: 1 stand dc in first st, 1 ch, working into first V st ch-sp (1 dc, 1 ch) 3 times, 1 dc in same st; 1 sc into 3rd dc on the shell 2 rows below working over 5 ch from previous row fixing it in position, 1 shell into next V st, 1 sc into 3rd dc on the shell 2 rows below working over 5 ch from previous row fixing it in position, 1 shell into last V st working last dc into top of last st, turn.
Row 6: 1 stand dc in first st, 1 ch, 1 dc in same st (counts as first V st), (5 ch, miss next shell, 1 V st into next sc) repeat across until last shell, 5 ch, miss next shell, 1 V st into top of last dc, turn.
Row 7: 1 stand dc in first st, 1 ch, working into first V st ch-sp (1 dc, 1 ch) 3 times, 1 dc in same st; (1 sc into 3rd dc on the shell 2 rows below working over 5 ch from previous row fixing it in position, 1 shell into next V st) repeat across until last V st, 1 sc into 3rd dc on the shell 2 rows below working over 5 ch from previous row fixing it in position, 1 shell into last V st working last dc into top of last st, turn.
Repeat Row 6 – 7 until you have 51 (53, 55, 57, 57, 59, 59, 61, 61) rows in total. Do not fasten off, continue the pattern with Neckline.
Neckline
Change to a smaller hook.
Row 1: 1 stand dc, * (1 dc in next 1 ch-sp, 1 dc in next dc) repeat across whole shell, 1 tr in next sc; repeat from * across working last dc into the last st.
[259 (269, 279, 289, 289, 299, 299, 309, 309) sts]
Row 2: 1 stand dc, (1 FPdc in next, 1 BPdc in next) repeat across to last st, 1 dc in last st.
Row 3: 1 stand dc, work FPdc around each FPdc and BPdc around each BPdc to last st, 1 dc in last st.
Repeat Row 3 another 7 times or until you reach the desired width of the neckline. Fasten off.
Please note: To stop the neckline stretching out of proportion, you can work a row of slip stitches across the last row with larger hook.
Lace Crochet Shrug Sleeves
To unlock Exclusive Subscriber content click on the “Sign Up For Free” button in the box below! The Grow.me App window will pop up so you can subscribe.
To create an account you can either sign in with your existing Google or Facebook account. Alternatively, you can create an account with an email address and new password.
Every time you see “Unlock Exclusive Content” on my blog, you can just log in to your Grow account. All you need to do is press the “switch to login” button in the top right corner.
If you’ve forgotten your password, click the forgot password link and follow the instructions on how to reset your password.
Unfortunately, I am unable to assist in resetting Grow passwords or accessing your Grow account.
Final Thoughts
I hope you enjoyed this free lace crochet shrug pattern. If you think your crafty friends will like this pattern, why not share it with them?
You might also like these crochet patterns:
- 20 Simple Crochet Shrug Patterns With Free Tutorials
- Free Crochet Shrug Pattern For Women
- Crochet Ponchette Free Pattern – Midnight Walk
- Free Easy Beginner Crochet Poncho From Rectangles
Firstly, you can share a direct link to this pattern on your social media.
Secondly, do not forget to pin this page to your favorite Pinterest Board so you can easily find it later too.
Thirdly, I also send out a fun and free newsletter that is packed with crochet goodies! It is full of free crochet patterns, hand-picked round-ups, and stitch tutorials.
You will also become one of my VIPs! Receive exclusive discount codes on newly released patterns that I do not share anywhere else!
So, my crochet newsletter is THE place to be! Sign up below today for a free PDF delivered straight to your inbox right after you sign up!

Veronika Cromwell | Blue Star Crochet
Veronika is a master in modern crochet design.
With a relentless focus on innovation and a vision that knows no bounds, she meticulously hones her crochet expertise she shares via crochet patterns, tutorials and online courses.
She helps the knowledge-thirsty crocheters bulldoze their way through hundreds of crochet techniques effortlessly and with ease like sharp scissors cutting thread.
Creating timeless fashion pieces without the “use-by-date” that stand the test of time in modern world is her lifelong mission.
Featured in Inside Crochet, Simply Crochet, Crochet Now and Happily Hooked and other awesome spaces on the internet, you too can join the crochet revolution!
Join her as she conquers the crochet world, one stitch at a time.


Very cute 🥰
thank you!
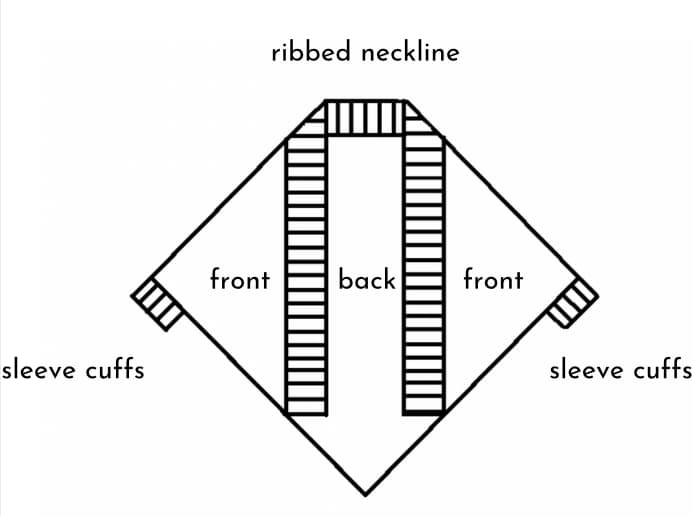
This pattern is just what I was looking for. I looked at your size chart and am baffled. I normally wear an XL/2XL for size but it says that the width is 32/33 inches. I wear a size 40 bra. Would you please help me with the correct sizing? Thank you so much! I want to make this very soon!
The 33 inches width (if you look at the provided schematic) goes from edge of one sleeve to the other sleeve edge = this is the total width that covers your back and front as well as both the sleeves and a bit of movement in the garment when being worn. As it is worked from the bottom corner upwards to the widest edge, you can start working on it and try to drape it across your shoulders as you go. If you feel like you have reached the desired width, you can stop increasing, otherwise you can carry on until the triangle is large enough to cover your shoulders. I hope that helps.