This post contains affiliate links
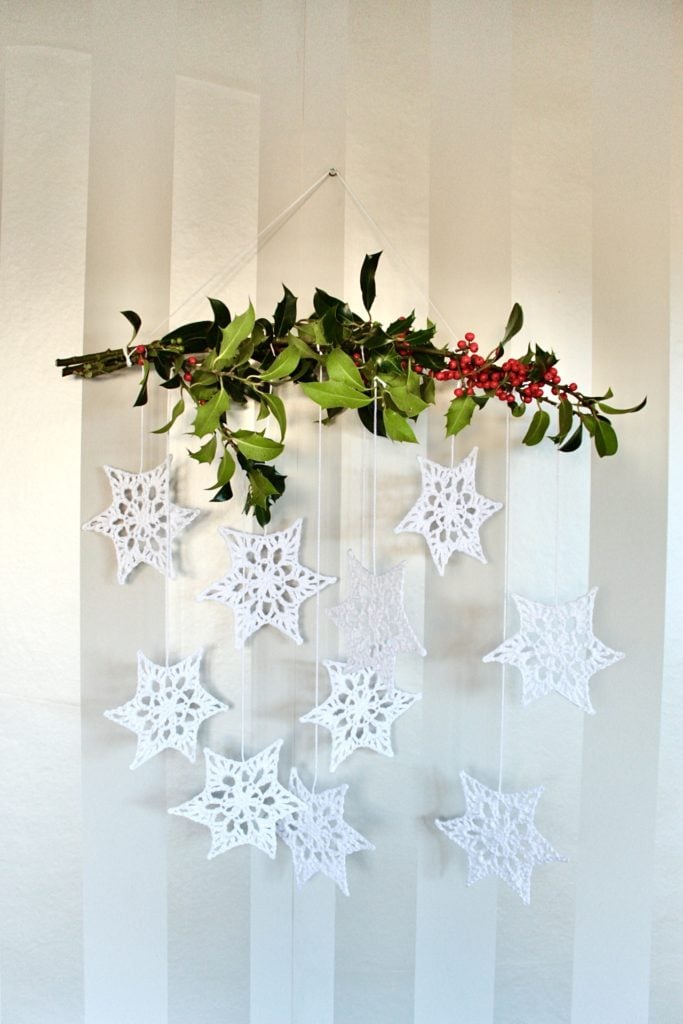
I have gone full on winter season ready with my Snowflake Wall Hanging- Winter Star. Check out the blog post below and get the free crochet pattern.
SNOWFLAKE WALL HANGING DESIGN PROCESS
I have fancied designig my very own crochet snowflake for some time and I have finally done it! My Winter Star Snowflake Wall Hanging is the perfect crochet item to decorate your home with. I love the fact that it is not strictly Christmas related so you can keep it in your home for longer.
I love the simplicity of my crochet snowflake as it only consists of 4 rounds. It works up super fast and you can make the whole wall hanging in a couple of days!
I have used a brand of holy to create my wall hanging. But you can use pine tree branch or even just a rustic looking wooden stick would do the trick! (see what I did there? I’m sorry…)

Get the ad free, printer friendly PDF version of this pattern from my shops.

I love how versatile my snowflake wall hanging is because it doubles up as a door hanging too. I think it would look lovely hanging in your window as well. So, whatever part of your house you are planning to decorate, this snowflake decoration would be perfect.
Why not pin this project for later?

This blog post contains affiliate links and if you click through them to make a purchase, I will earn a commission. I link these companies and their products because of their quality and service not because of the commission I receive from your purchase.
YARN I USED FOR MY SNOWFLAKE WALL HANGING
I used King Cole Cottonsoft DK yarn for this project. It is a lovely yarn to work with and I love that it is super white. Just the perfect snow white colour for a crochet snowflake!
It wouldn’t be a quick crochet project if you got stuck on something. Hence why I made a video tutorial for you on how to crochet snowflake.

THIS PATTERN WAS DESIGNED AND WRITTEN BY VERONIKA CROMWELL OF BLUE STAR CROCHET COMPANY. PLEASE BE RESPECTFUL AND DO NOT SHARE, COPY, ALTER OR RESELL THIS PATTERN IN PART OR IN FULL AS YOUR OWN. YOU CAN SELL FINISHED ITEMS PRODUCED FROM THIS PATTERN WITH A LINK TO THE ORIGINAL PATTERN AND CREDIT TO THE DESIGNER.
THANK YOU.
MATERIALS
- King Cole Cottonsoft; (DK weight; 210m per 100g ball; 100% cotton) x 1 ball in White
- 4 mm crochet hook
- Yarn needle
- Scissors
- PVA glue
- Blocking mat
- Pins
- Cling film
- Holy or pine tree branch
FINISHED SIZE
14.5 cm measured from point to point
TENSION
Tension is not crucial for this project but the motif measures 4 cm across after completing round 2
STITCHES AND ABBREVIATIONS (US CROCHET TERMS)
ch- chain stitch
sl st- slip stitch
sc- single crochet
mc- magic circle
st- stitch
ch-sp – chain space
V st- (1 dc, 2 ch, 1 dc) worked in same st/space
dc- double crochet
tr- treble crochet
For abbreviations master list as set out by Craft Yarn Council, please CLICK HERE.

SNOWFLAKE WALL HANGING MAIN PATTERN
Start with magic circle.
Rnd 1: 1 ch, 6 sc into mc, sl st to first st. 6 dc
Rnd 2: 5 ch (counts as 1 dc + 2 ch), 1 dc in same st (first V st made), 1 V stin each st around, sl st to 3rd ch of beg 5 ch. 6 V st
Rnd 3: 1 ch, 1 sc in same st, * 5 ch, 1 sc in next dc; repeat from * around omitting last sc, sl st to first sc instead. Twelve 5 ch-sps
Rnd 4: 1 ch, sl st to next 5 ch-sp, 1 ch, 1 sc in same 5 ch-sp, * [(1 dc, 1 ch) twice, 1 tr, 4 ch, sl st to 3rd ch from hook to create picot, 1 ch, 1 tr, (1 ch, 1 dc) twice] in next 5 ch-sp, 1 sc in next 5 ch-sp; repeat from * 5 more times omitting last sc, sl st to first sc instead.
Fasten off leaving a long tail end.
FINISHING INSTRUCTIONS
Sew in the yarn end in the middle of the snowflake.
Dilute PVA glue with a little bit of warm water into pouring cream consistency.
Cover your blocking mat/board with cling film as the PVA glue mixture gets a little messy.
Submerge the motifs into the glue mix making sure it covers and saturates the snowflake.
Gently run the motif between your fingers to squeeze out any excess, stretch to desired shape and pin to the blocking mat to dry.
Once dry, tie the snowflakes to the branch using the tail end.
Attach another piece of string to the branch on either side to be able to hang the wall hanging up.
Happy crocheting! I hope you enjoyed the pattern.
If you wanted to browse through all my previously published designs for magazines and yarn companies, visit the shop section.
Check out the blog for more free patterns!
This blog post contains affiliate links and if you click through them to make a purchase, I will earn a commission. I link these companies and their products because of their quality and service not because of the commission I receive from your purchase.


what brand of holly did you use?? ty for the pattern – I was not able to DL it for free via Ravelry as there was 0 code provided that I could locate either here or on the blog hop website
I used a branch out of my MIL garden. Unfortunately, there was no code offered for a free download this time.